Convert JPG to PES for Brother and Babylock Embroidery Machines
If you've got a great design in JPG format that you want to stitch out on your Brother or Babylock embroidery machine, you've probably discovered that you can't just load the image and hit start. These machines need specialized PES files - the embroidery file format that tells your machine exactly how to stitch your design. Converting a JPG to PES isn't as simple as changing a file extension - it requires a process called digitizing, where your flat image gets translated into stitch commands. Follow the guidelines to know how to convert JPG to PES for embroidery.
Why You Can't Just "Convert" JPG to PES Directly
Here's the thing about JPGs - they're made of pixels, while PES files contain stitch instructions. Your embroidery machine doesn't understand images; it needs precise directions about:
- Where to place each stitch
- What type of stitch to use (fill, satin, running)
- The order of stitching
- When to change thread colors
- How to handle curves and corners
This is why you need either specialized software or a professional digitizing service to make this conversion properly. Attempting to use auto-conversion tools often leads to disappointing results like:
- Stitches that don't follow the design properly
- Puckered or distorted fabric
- Missing details in small text
- Uneven fill areas
Three Ways to Convert JPG to PES
1. Using Brother's PE-Design Software (Best for Brother Users)
If you own a Brother machine, their PE-Design software is the most straightforward solution.
Here's how it works:
- Import your JPG into the software
- Use the auto-digitizing feature as a starting point
- Manually adjust stitch types and directions
- Set proper densities for different areas
- Save as a PES file
Pros:
✔ Made specifically for Brother machines
✔ Good integration with your embroidery unit
✔ Includes helpful tutorials
Cons:
✖ Can be pricey for casual users
✖ Auto-digitizing still needs manual tweaks
2. Using Hatch Embroidery (Great for Both Brother & Babylock)
Hatch Embroidery is a popular choice because it works well with multiple machine brands while being more affordable than professional-grade software.
The process:
- Open your JPG in Hatch
- Use the trace function to outline your design
- Assign stitch types to different elements
- Adjust stitch density and underlay
- Export as PES
Pros:
✔ More affordable than Wilcom
✔ Good balance of auto and manual tools
✔ Works with both Brother and Babylock
Cons:
✖ Still has a learning curve
✖ Not as precise as professional digitizing
3. Using a Professional Digitizing Service (Best Results)
If you want perfect results without the software learning curve, services like Digitizing Buddy, Absolute Digitizing, or Cool Embroidery Designs can convert your JPG to PES professionally.
How it works:
- Upload your JPG to their website
- Specify any special requirements
- Receive your PES file in 24 hours or less
- Test stitch and request revisions if needed
Pros:
✔ Perfectly optimized stitches
✔ No software to buy or learn
✔ Handles complex designs well
Cons:
✖ Costs per design (though often very reasonable)
✖ Need to plan ahead for turnaround time
Step-by-Step: Converting JPG to PES in PE-Design
Let's walk through the actual process using Brother's software:
Import Your Image
o Open PE-Design and select "New"
o Click "Import" and choose your JPG
o Adjust the size to fit your hoop
Auto-Digitize (Starting Point)
o Select the auto-digitize tool
o Choose between outline or fill emphasis
o Let the software create the initial stitch plan
Manual Adjustments (Crucial Step!)
o Clean up any stray stitches
o Adjust stitch directions for better coverage
o Modify densities (0.4mm-0.6mm for fills)
o Add underlay stitches where needed
Preview and Test
o Use the 3D preview function
o Check stitch count and estimated time
o Make final tweaks
Save as PES
o Select "Save As"
o Choose PES format
o Transfer to your machine via USB
Common Problems & Solutions
Problem: Design Looks Pixelated
Solution:
- Start with a higher resolution JPG (300dpi+)
- Convert to vector first using Illustrator or Inkscape
- Manually clean up the digitized version
Problem: Fabric Puckers
Solution:
- Reduce stitch density
- Add proper underlay
- Use stabilizer when stitching
Problem: Small Details Get Lost
Solution:
- Simplify very small text (under 1/4")
- Use satin stitches instead of fills for tiny elements
- Consider enlarging the design if possible
Free Alternatives Worth Considering
If you're not ready to invest in software:
- Ink/Stitch (free Inkscape plugin)
- SewArt (limited but affordable)
- My Editor (Brother's free online tool)
Just remember - free tools often require more manual work and may not produce professional results for complex designs.
When to Consider Professional Digitizing
You might want to use a service instead of DIY when:
- Your design has complex gradients or shadows
- You need small text that remains readable
- You're working with specialty fabrics like knits
- You don't want to invest time in learning software
- You need multiple designs done quickly
Final Thoughts
Converting JPG to PES for your Brother or Babylock machine is absolutely possible - you just need the right tools and approach. While software like PE-Design and Hatch can get the job done, professional digitizing services often deliver better results with less hassle, especially for important projects.
Remember:
✔ Start with the highest quality JPG possible
✔ Auto-digitizing is just a starting point
✔ Manual adjustments make all the difference
✔ When in doubt, professional digitizing saves time and materials
Now that you know your options, you're ready to turn those JPG designs into beautiful embroidered creations! Whether you choose to DIY with software or use a service like Digitizing Buddy, you'll be stitching out perfect designs in no time.
Categorias
Leia mais
The Digital Health Market has entered a new phase of rapid expansion, fueled by technological advances, rising patient demand for connected care, and increased global investment. According to market analysis, the sector is projected to grow at a double-digit pace over the next decade. Key players including Philips, Medtronic, GE Healthcare, Abbott, and Apple are leading this transformation by...

Bioma Probiotics Review, Benefits and Buy Now ORDER NOW : https://healthyifyshop.com/OrderBiomaProbiotics For More...
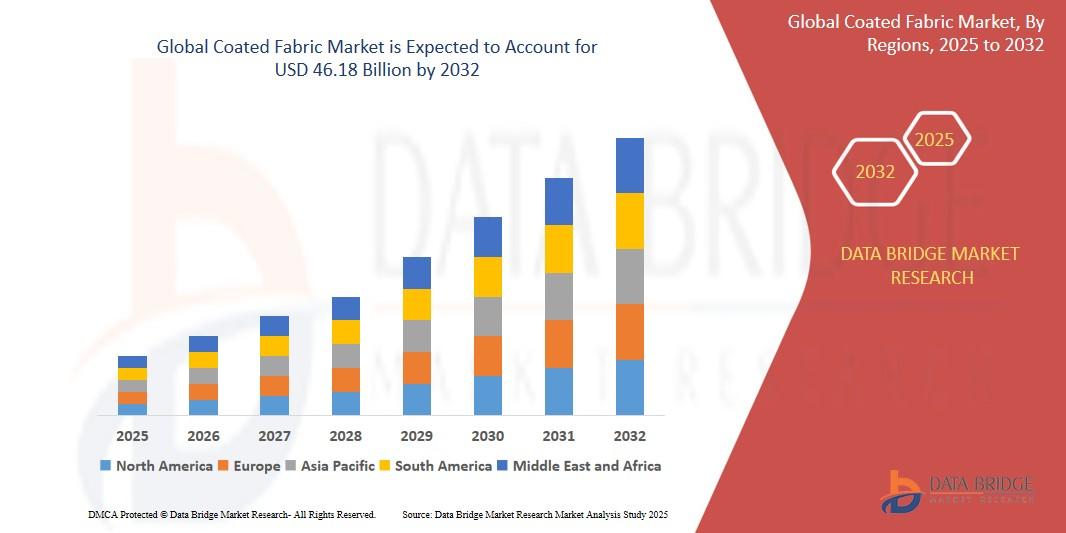
Executive Summary Coated Fabric Market: Growth Trends and Share Breakdown The Global Coated Fabric Market size was valued at USD 30.81 billion in 2024 and is expected to reach USD 46.18 billion by 2032, at a CAGR of 4.6% during the forecast period The Coated Fabric Market report has been formed with the appropriate expertises that utilize established and unswerving...
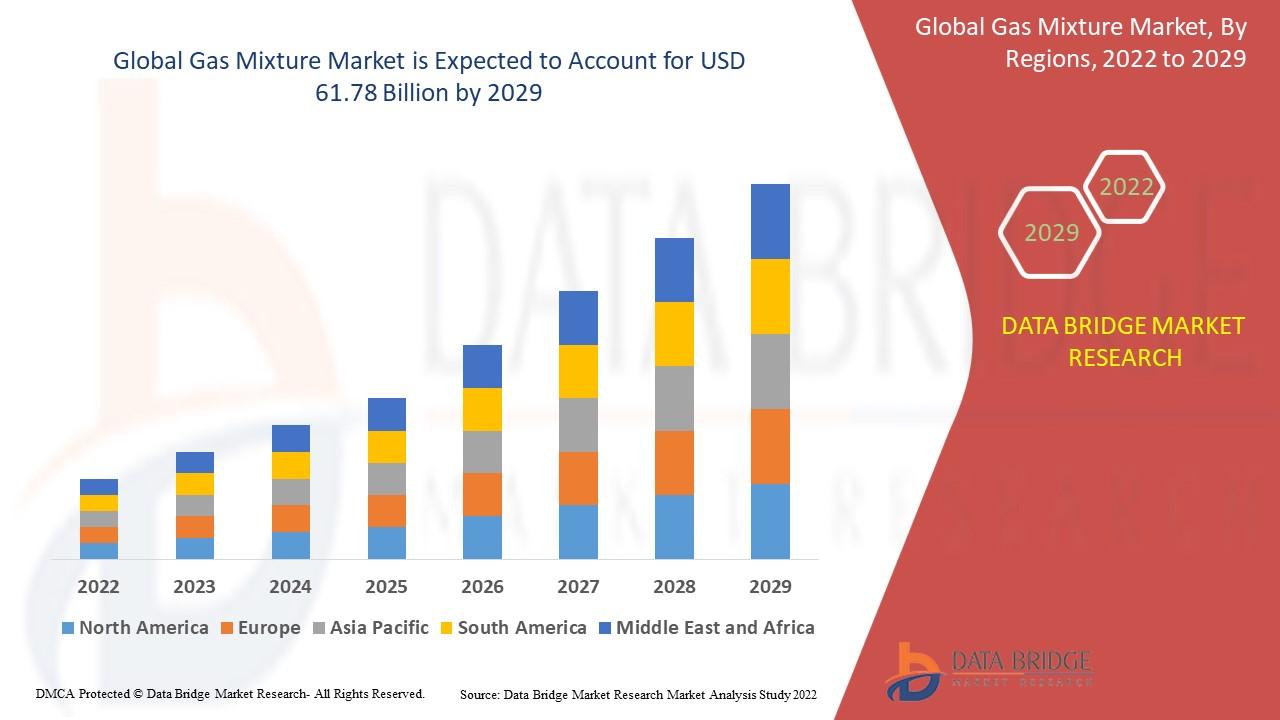
Future of Executive Summary Gas Mixture Market: Size and Share Dynamics Data Bridge Market Research analyses that the gas mixture market is expected to undergo a CAGR of 5.94% during the forecast period. This indicates that the market value, which was USD 38.94 billion in 2021, would rocket up to USD 61.78 billion by 2029. Businesses can attain detailed insights with the large scale Gas Mixture...
Maintaining good oral health is more than just brushing and flossing—it requires professional care from trusted dental experts. If you’re looking for the Best Dentist in Mukherjee Nagar or an experienced Dental Implants Specialist in North Delhi, you deserve a clinic that combines advanced technology, expert treatment, and personalized care. Smile Konnekt stands out as a hub...