Easy Lion Drawings: Step-by-Step Tutorials for Beginners
Creating easy lion drawings is an exciting way for beginners to dive into the world of art. Lions, with their majestic manes and powerful presence, make for a captivating subject. This comprehensive guide offers detailed, step-by-step tutorials tailored for novice artists, ensuring anyone can craft stunning lion sketches with confidence. Whether using pencil, charcoal, or digital tools, these instructions break down the process into manageable steps, making lion drawing accessible and enjoyable.
Why Choose Lion Drawings for Beginners?
Lions are an ideal subject for aspiring artists due to their distinct features, such as the flowing mane, expressive eyes, and structured face. These elements allow beginners to practice basic shapes while gradually incorporating more complex details. The symmetry of a lion’s face offers a forgiving starting point, while the mane provides opportunities to experiment with texture and shading. This tutorial focuses on simplifying these features, ensuring even those new to drawing can achieve professional-looking results.
Materials Needed for Easy Lion Drawings
Before starting, gather essential supplies to streamline the process:
-
Pencils: A range of pencils (HB for sketching, 2B and 4B for shading) ensures versatility.
-
Paper: Smooth sketch paper or a drawing pad works best for clean lines.
-
Eraser: A kneaded eraser allows precise corrections without smudging.
-
Blending Tools: Tortillons or tissue paper help create smooth shading transitions.
-
Optional Digital Tools: Tablets with apps like Procreate or Adobe Fresco are great for digital artists.
Having these tools ready sets the stage for a seamless drawing experience, allowing focus on technique rather than scrambling for materials.
Step-by-Step Guide to Drawing a Lion’s Face
Step 1: Sketching the Basic Shape
Begin with a light pencil sketch to map out the lion’s head. Draw a large circle for the skull, then add a smaller oval below for the muzzle. Connect these shapes with gentle curves to form the jawline. Place two small circles on either side of the head for the ears. This foundational structure ensures proportions remain balanced as details are added.
Step 2: Outlining the Facial Features
Next, add the lion’s facial features. Draw two almond-shaped eyes along the horizontal midline of the circle, spacing them evenly. Below, sketch a wide, triangular nose at the top of the muzzle. Add a small, curved line beneath for the mouth. Ensure the eyes are expressive, with a slight upward tilt to capture the lion’s regal demeanor. These features serve as the focal point of the drawing.
Step 3: Crafting the Majestic Mane
The mane is a defining feature of a lion drawing. Start by sketching loose, wavy lines radiating from the head’s outer edge. Vary the length and direction of these lines to mimic natural fur flow. For a fuller mane, layer additional strokes, keeping them light to allow adjustments. This step introduces texture, making the lion appear dynamic and lifelike.
Step 4: Adding Details and Texture
Refine the drawing by adding details. Darken the pupils, leaving a small white dot for a reflective glint. Add short, curved lines around the eyes and nose to suggest fur texture. For the mane, use quick, flicking strokes to create a sense of volume. Incorporate subtle lines on the muzzle to indicate whiskers, keeping them faint to avoid overpowering the face.
Step 5: Shading for Depth
Shading brings the lion drawing to life. Use a 2B pencil to add soft shadows under the eyes, along the muzzle, and beneath the mane. Blend these areas with a tortillon for a smooth gradient. For the mane, apply darker shading at the base, gradually lightening toward the tips to suggest depth. This technique enhances the three-dimensional quality of the sketch.
Step 6: Final Touches and Refinement
Review the drawing for balance and proportion. Erase any stray guidelines and strengthen key outlines with a 4B pencil. Add final details, such as extra fur texture or highlights, to polish the piece. For digital artists, use layers to experiment with effects like soft glows or color accents to make the lion pop.
Tips for Mastering Easy Lion Drawings
-
Practice Basic Shapes: Mastering circles, ovals, and curves builds confidence in proportion.
-
Study Lion Photos: Reference images help understand fur patterns and facial structure.
-
Experiment with Styles: Try cartoonish or realistic lions to find a preferred approach.
-
Be Patient with Shading: Gradual layering creates smoother, more professional results.
Common Mistakes to Avoid
Beginners often rush the mane, resulting in a flat appearance. Take time to vary stroke direction and length. Another pitfall is uneven proportions—always double-check the placement of eyes and nose before detailing. Finally, avoid over-darkening shadows, as this can make the drawing look heavy; subtlety is key.
Exploring Variations of Lion Drawings
Once comfortable with the basic lion face, experiment with different poses, such as a roaring lion or a side profile. Adjust the mane’s shape or add a background, like a savanna landscape, to enhance the composition. These variations build skills and keep the process engaging.
By following these detailed steps, beginners can create easy lion drawings that rival professional artwork. The structured approach ensures success, while the creative freedom of textures and styles encourages artistic growth. With practice, these tutorials will transform novices into confident artists, ready to tackle more complex subjects.
Kategorien
Mehr lesen
Plumbing plays a crucial role in keeping homes and businesses safe, functional, and comfortable. For residents in Mawson Lakes, finding a trusted professional is essential to ensure plumbing systems run smoothly year-round. When problems occur, having a reliable plumber mawson lakes on hand can save time, money, and unnecessary stress. From emergency repairs to preventative maintenance,...

ในยุคที่บุหรี่ไฟฟ้ากลายเป็นทางเลือกใหม่ของผู้บริโภค relx infinity plus โดดเด่นขึ้นมาในฐานะรุ่นพัฒนาล่าสุดจากแบรนด์ RELX ด้วยดีไซน์ทันสมัย ระบบ Super Smooth™ ที่ให้ความรู้สึกนุ่มนวล และแบตเตอรี่ที่ใช้งานได้นานกว่าเดิม Infinity Plus จึงเหมาะสำหรับผู้ใช้งานทั้งมือใหม่และสายสูบตัวจริง การมองหา ร้านขายหัวพอต relx ใกล้ฉัน ไม่ใช่เรื่องยากในปัจจุบัน...
3D Printing Dubai - In the heart of the UAE, Inoventive 3D is making waves in the world of advanced manufacturing with its innovative approach to 3D printing in Dubai. As the demand for smart, fast, and cost-effective manufacturing solutions grows, Inoventive 3D stands at the forefront, offering clients across industries a reliable, creative, and technologically advanced partner. From...

"Market Trends Shaping Executive Summary Cardio Equipment Market Size and Share The global cardio equipment market size was valued at USD 17.85 billion in 2024 and is expected to reach USD 28.90 billion by 2032, at a CAGR of 5.50% during the forecast period The Cardio Equipment Market report puts light on the change in the market which is...
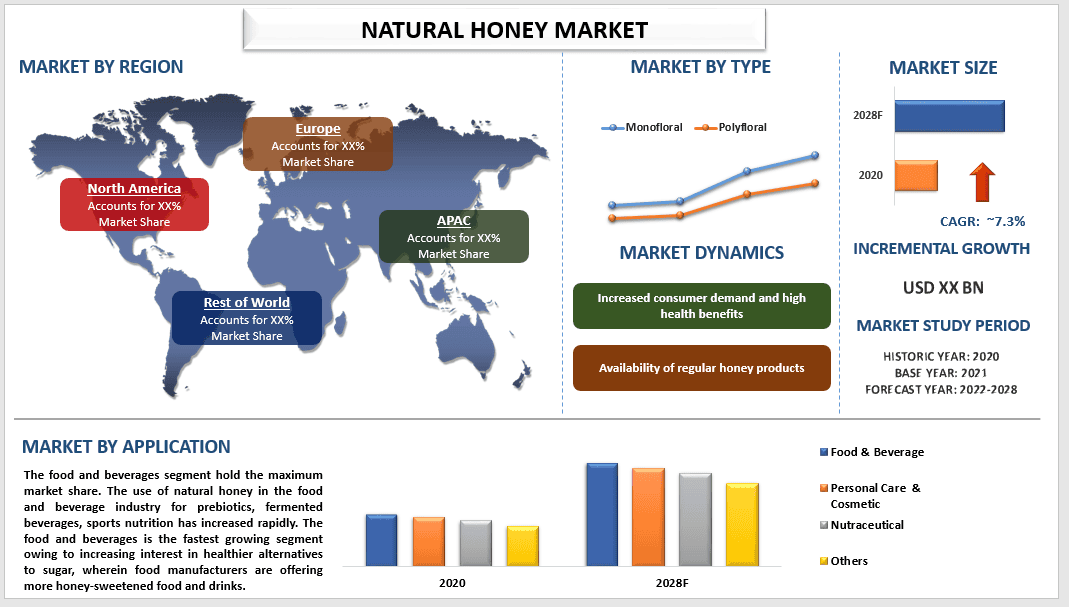
The Natural Honey Market is expected to register a CAGR of around 7.3% over the period of 2022-2028. The global natural honey market is poised for steady growth, expected to expand at a compound annual growth rate (CAGR) of approximately 7.3% from 2022 to 2028. Natural honey, a sweet, nutrient-rich liquid produced by various wild bee species, has gained significant traction not only as a food...