


Dyson V6 Battery Replacement – A Home User’s Guide

If you own a Dyson V6, chances are you’ve gotten a lot of good use out of it. The V6 was one of Dyson’s earlier cordless vacuums, but it’s still loved by many of us because it’s light, easy to grab, and does a decent job on both floors and furniture. Like me, maybe you use it for quick cleanups in the kitchen or for tackling pet hair on the couch.
But if you’ve had it for a few years, you might notice something: the battery just doesn’t last like it used to. Maybe it runs for only a few minutes before cutting out, or it flashes that dreaded red light when you try to charge it. That’s usually the sign that the battery has reached the end of its life.
I went through this with my own Dyson V6 recently, and instead of rushing out to buy a whole new vacuum, I decided to try replacing the Dyson V6 battery myself. It turned out to be a lot easier than I thought. So I figured I’d put together this home-style guide—not super technical, just step-by-step with my own notes—so you can replace your V6 battery too.
1. Why the Battery Goes Bad
First things first: the Dyson V6 uses a lithium-ion battery. These batteries are great because they’re light and charge quickly, but they don’t last forever. Over time, every charge cycle slowly wears them down. On average, you can expect a Dyson V6 battery to last about 3–4 years, depending on how often you use it and whether you always run it on “Max” mode (which drains it faster).
In my case, I noticed after about three years that my V6, which used to run for around 20 minutes, was barely making it past 5 minutes. That’s when I knew it was time to swap the battery.
2. Signs You Need a New Dyson V6 Battery
If you’re not sure yet, here are the common signs that your Dyson V6 battery is ready to be replaced:
-
Short runtime – It dies after a few minutes, even if you charge it fully.
-
Flashing red light – The vacuum might blink a red light when you try to charge it, which usually signals a battery fault.
-
Won’t charge – It stays dead even after hours on the charger.
-
Inconsistent power – It cuts out randomly in the middle of cleaning.
If you’re experiencing any of these, don’t panic—it doesn’t mean your vacuum is broken, just the battery.
3. Choosing the Right Replacement Battery
When I first started looking, I was a bit overwhelmed because there are two types of batteries you can buy:
-
Official Dyson Replacement
-
Costs more (usually around $80–$100).
-
Guaranteed fit and safety-tested by Dyson.
-
Same capacity as the original.
Aftermarket/Third-Party Replacement
-
Cheaper (anywhere from $30–$60).
-
Some offer higher capacity, like 3,000 mAh or more, which means longer runtime.
-
Quality can vary, so it’s important to buy from a reputable seller.
I personally went with a mid-priced third-party battery because I didn’t want to spend almost as much as I paid for the vacuum years ago. Mine claimed to give a few more minutes of runtime compared to the original, and so far it’s been solid.
4. Tools You’ll Need
Luckily, you don’t need a full toolbox for this. All I used was:
-
A small Phillips screwdriver (the kind you’d use for glasses or electronics works fine).
-
The new battery.
-
About 5–10 minutes of time.
That’s it. No special skills required.
5. Step-by-Step: How I Replaced My Dyson V6 Battery
Alright, here’s the part where I walk you through exactly what I did:
Step 1: Remove the Dust Bin
-
First, I pressed the red release button and slid the dust bin off the vacuum. This makes it easier to get to the battery screws.
-
Don’t worry about emptying the bin—it comes off cleanly.
Step 2: Unscrew the Battery
-
There are two screws holding the battery in place:
-
One on the handle (right where your hand grips).
-
One underneath the vacuum near the trigger.
I used my Phillips screwdriver to take them out. They’re small, so be careful not to lose them.
Step 3: Remove the Old Battery
-
Once the screws were out, the old battery just slid right out. Mine looked a bit worn, and honestly, it felt good to be replacing it.
Step 4: Insert the New Battery
-
I lined up the new battery and slid it into place. It clicked in perfectly.
-
Then I put the screws back in—handle screw first, then the one underneath.
Step 5: Reattach the Dust Bin
-
Finally, I slid the dust bin back on until it clicked.
And that was it! The whole thing took less than 10 minutes.
6. First Charge and Test
I plugged the vacuum in and let the new battery charge for about 4–5 hours (the first charge always takes a bit longer). Then I gave it a test run.
The difference was night and day. My V6 was back to running like it used to, giving me around 20 minutes on normal mode. It felt like I had a brand-new vacuum without spending a few hundred dollars.
7. Tips for Making Your New Battery Last Longer
Now that I’ve been through the replacement process, I’ve picked up some tips to make the new battery last as long as possible:
-
Don’t overuse Max Mode – It’s tempting because it sucks up dirt so quickly, but it kills the battery fast. I try to save Max Mode for stubborn spots.
-
Charge after use, but don’t leave it plugged in forever – I usually charge it and then unplug it once it’s full.
-
Store it at room temperature – Don’t keep it in a freezing garage or a hot laundry room.
-
Clean the filters regularly – A clogged filter makes the motor work harder, draining the battery faster.
-
Avoid running it until it’s completely dead every time – Recharge before it cuts out if you can.
8. Is It Worth Replacing the Battery on a Dyson V6?
This was a question I had before I bought the battery. Honestly, I think it depends on how much you use your V6.
-
If you use it daily and rely on it for all your cleaning, replacing the battery is definitely worth it.
-
If you’ve been thinking of upgrading to a newer Dyson (like the V10 or V11), you might weigh the cost of the battery against investing in a new machine.
For me, spending $40 on a new battery was a no-brainer compared to spending $400+ on a new vacuum.
9. Comparing Dyson V6 Battery Replacement to Other Models
Since I’ve done this, I looked into how it works for other Dyson models too. The V7, V8, and V10 all have similar processes, but the batteries get bigger and more expensive. The V6 is one of the simplest to work on, which makes it a great “first project” if you’re nervous about DIY.
10. Final Thoughts
Replacing the Dyson V6 battery might sound intimidating at first, but honestly, it’s one of the easiest fixes you can do at home. I’m not a professional repair person by any means, and I managed it in under 10 minutes with just a screwdriver.
The key is choosing the right replacement battery and taking your time with those little screws. Once you swap it, you’ll feel like you’ve got a brand-new vacuum again.
So if your V6 is giving up after just a few minutes of cleaning, don’t rush to toss it out. Try a new battery first—you might be surprised how much life your old vacuum still has in it.
Categorias
Leia mais
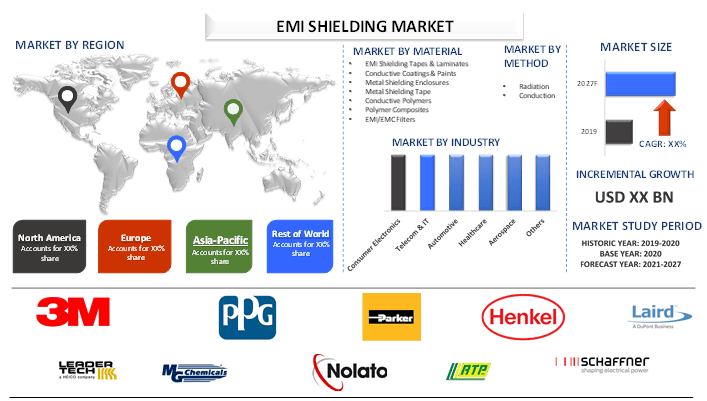
A comprehensive overview of the global EMI Shielding market is recently added by UnivDatos to its humongous database. The report has been aggregated by collecting informative data from various dynamics such as market drivers, restraints, and opportunities. This innovative report makes use of several analyses to get a closer outlook on the EMI Shielding Market globally. This report offers a...
Energy from renewable natural resources, such as sunshine, wind, water (hydropower), geothermal heat, and biomass, is referred to as renewable energy. Renewable energy sources are environmentally sustainable because they don't deplete over time and emit little to no greenhouse gases, in contrast to fossil fuels. Without causing air pollution or making a substantial contribution to climate...

In the fast-evolving digital age, visual content is more than just a trend—it's a necessity. As audiences become increasingly visually driven, animation has become one of the most powerful storytelling tools available. Among the many animation techniques, 2D animation stands out for its timeless charm, affordability, and artistic versatility. For companies, creators, and educators seeking...

"Executive Summary Chlorine Market : CAGR Value The global chlorine market size was valued at USD 34.32 billion in 2024 and is expected to reach USD 60.90 billion by 2032, at a CAGR of 7.43% during the forecast period. This Chlorine Market report aids to establish correlative relationship between the product brand and consumers’ needs and...
"Executive Summary Bubble Lined Courier Bag Market : Data Bridge Market Research analyses that the bubble lined courier bag market value, which was USD 964.16 million in 2021, is expected to reach the value of USD 1,402.94 million by 2029, at a CAGR of 4.80% during the forecast period. "Low density Polyethylene (LDPE)" accounts for the largest product type segment in the bubble...