7 Easy Steps to Install WordPress on Hostinger Using FTP
If you want full control over your WordPress installation, learning how to install WordPress on Hostinger using FTP is a powerful skill that separates beginners from serious website owners. Unlike one-click auto-installers, FTP gives you greater flexibility, especially when dealing with custom setups or troubleshooting complex installations.
Before we begin, here’s something valuable for you — if you're looking to save on your Hostinger plan, don’t forget to grab a hostinger coupon to get the best deal before you start building your WordPress site.
This guide will walk you through 7 simple, foolproof steps to manually install WordPress on Hostinger with FTP. We'll also cover frequently asked questions, provide solutions to common errors, and share optimization tips.
Step 1: Download the Latest WordPress Files
Visit WordPress.org and download the latest version of WordPress. This ZIP file contains all the core files required to run your website.
Unzip the folder locally on your computer — we’ll upload these files via FTP later.
Step 2: Log In to Your Hostinger Account and Access FTP
Access your Hostinger dashboard and go to Files > FTP Accounts. You’ll find your FTP credentials (hostname, username, and port). Use an FTP client like FileZilla to connect using these details.
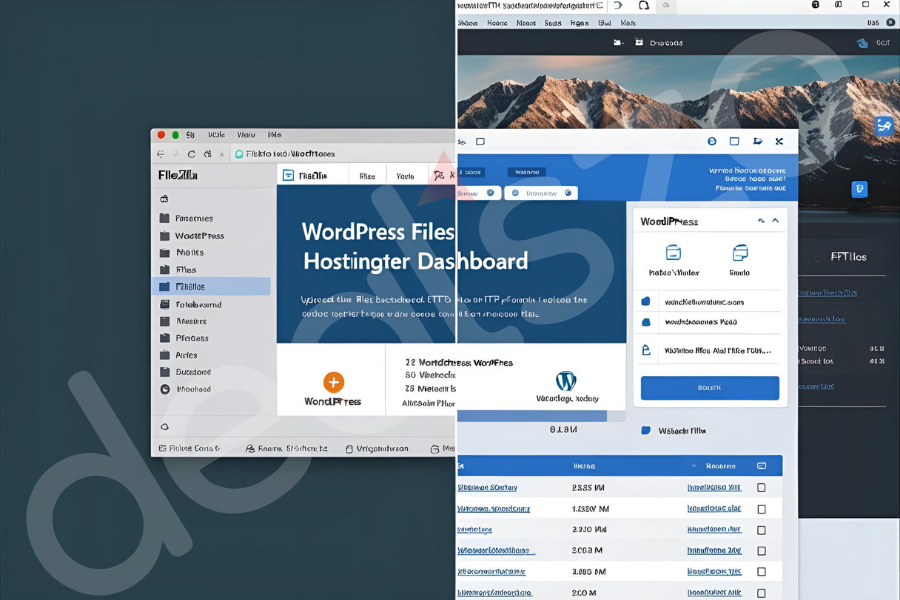
Step 3: Connect Using FileZilla or Another FTP Client
Launch FileZilla and input the FTP host, username, password, and port (usually 21). Once connected, you’ll see your server files on the right and local files on the left.
Navigate to the public_html folder or the directory where you want WordPress installed.
Step 4: Upload WordPress Files to Hostinger
Now, upload all the files from the unzipped WordPress folder (not the folder itself, just the contents) into the public_html directory on your Hostinger account. This process may take a few minutes depending on your connection.
Step 5: Create a MySQL Database in Hostinger
Go back to your Hostinger control panel. Navigate to Databases > MySQL Databases and create a new database. Take note of the database name, username, and password — you’ll need them in the setup process.
Step 6: Run the WordPress Installation Script
Open your browser and go to yourdomain.com. You’ll see the WordPress installation wizard. Choose your language, enter your database details, and complete the setup by setting your site title, username, and password.
Step 7: Finish Setup and Log In
After clicking “Install WordPress,” you’ll be directed to the login page. Log in with the credentials you created and begin customizing your new site!
FAQ: People Also Ask
Can I install WordPress on Hostinger without the auto installer?
Yes. You can manually install WordPress on Hostinger using FTP and a MySQL database without relying on the auto-installer.
Do I need to use FTP to install WordPress?
No, but using FTP gives you more control, especially if you want to customize core files or troubleshoot issues during setup.
What are the FTP credentials for Hostinger?
Your FTP credentials (host, username, and port) can be found in your Hostinger control panel under the FTP Accounts section.
Is manual installation better than one-click install?
Manual installation is better for advanced users who want custom configurations or experience problems with one-click tools.
How long does it take to install WordPress via FTP?
The process takes around 10–20 minutes, depending on your familiarity and internet speed.
Conclusion
Installing WordPress on Hostinger using FTP isn’t just a skill — it’s a smart strategy for anyone who values flexibility and control over their site. By following the 7 steps above, you now have a deeper understanding of the process, and you're prepared to handle future installations or migrations like a pro.
Whether you're launching a blog, business site, or portfolio, doing it manually ensures you’re in the driver’s seat — and that makes all the difference.
Ready to go deeper? Check out our advanced WordPress optimization and security guides next!
Categorías
Read More
"Executive Summary Paprika Powder Market : CAGR Value Global paprika powder market size was valued at USD 5.49 billion in 2023 and is projected to reach USD 9.22 billion by 2031, with a CAGR of 6.7% during the forecast period of 2024 to 2031. This global Paprika Powder Market research report encompasses drivers and restraints for the market which are derived from the...
In the modern landscape of driving education, technology plays an increasingly vital role. For driving instructors in the UK, integrating digital tools into their teaching methods is no longer optional—it’s essential for effective learner development. One such innovation is the use of theory test apps, which offer numerous advantages in preparing students for both their theory and...
Discover lasting freedom from addiction with a personalized approach at Miami Valley Recovery. As a premier Dayton addiction treatment center, our mission is to treat the disease of addiction with compassion, science-backed therapies, and a comprehensive support system. We offer outpatient programs, medication-assisted treatment (Suboxone®, Subutex®, Vivitrol®), and trauma-informed...
Latest Insights on Executive Summary Heat Seal Film Market Share and Size The global heat seal film market size was valued at USD 1.37 billion in 2024 and is expected to reach USD 2.04 billion by 2032, at a CAGR of 5.1% during the forecast period. Objectives of the Market research are kept in mind while preparing the reliable Heat Seal Film...

Erexol - Composition des capsules Erexol Erexol est formulé avec une combinaison d’ingrédients naturels soigneusement sélectionnés pour leurs propriétés bénéfiques sur la santé sexuelle et le bien-être général des hommes. Voici les principaux composants actifs présents dans les capsules,...